Setting Up WireGuard VPN for Debian and Phone and macOS Devices on Ubuntu Server
There are numerous tutorials on the internet have given me confusion during setting up the communication network between the peer-to-peer in the VPN (Virtual Private Network). Those scenarios were occurring may have the distribution version of current use on Linux, and the restriction policy of each VPS provider or Virtual Machine (VM) Platform.
To set up a VPN server is complicated on Google Cloud Platform because of the steps more than the non-GCP,
hence I would like to mention these steps as gather in an article.
This article will create a VM (Ubuntu 22) that chooses the IPv4 address on Google Cloud Platform for test purpose, and the Reserved Addresses (Private Addresses) will choose the same with the following diagram as my preferred.
The network diagram shows that this article will be prepared for one remote server in the top left corner.
The Reserved Address starts at 10.14.14.1 as my preferred, which is running on the Ubuntu 22.
Three clients.
- macOS platform
- The reserved address is assigned to macOS platform, which address is
10.14.14.3.
- The reserved address is assigned to macOS platform, which address is
- A cellphone device
- The reserved address is
10.14.14.2.
- The reserved address is
- debian 12
- The address of this device is
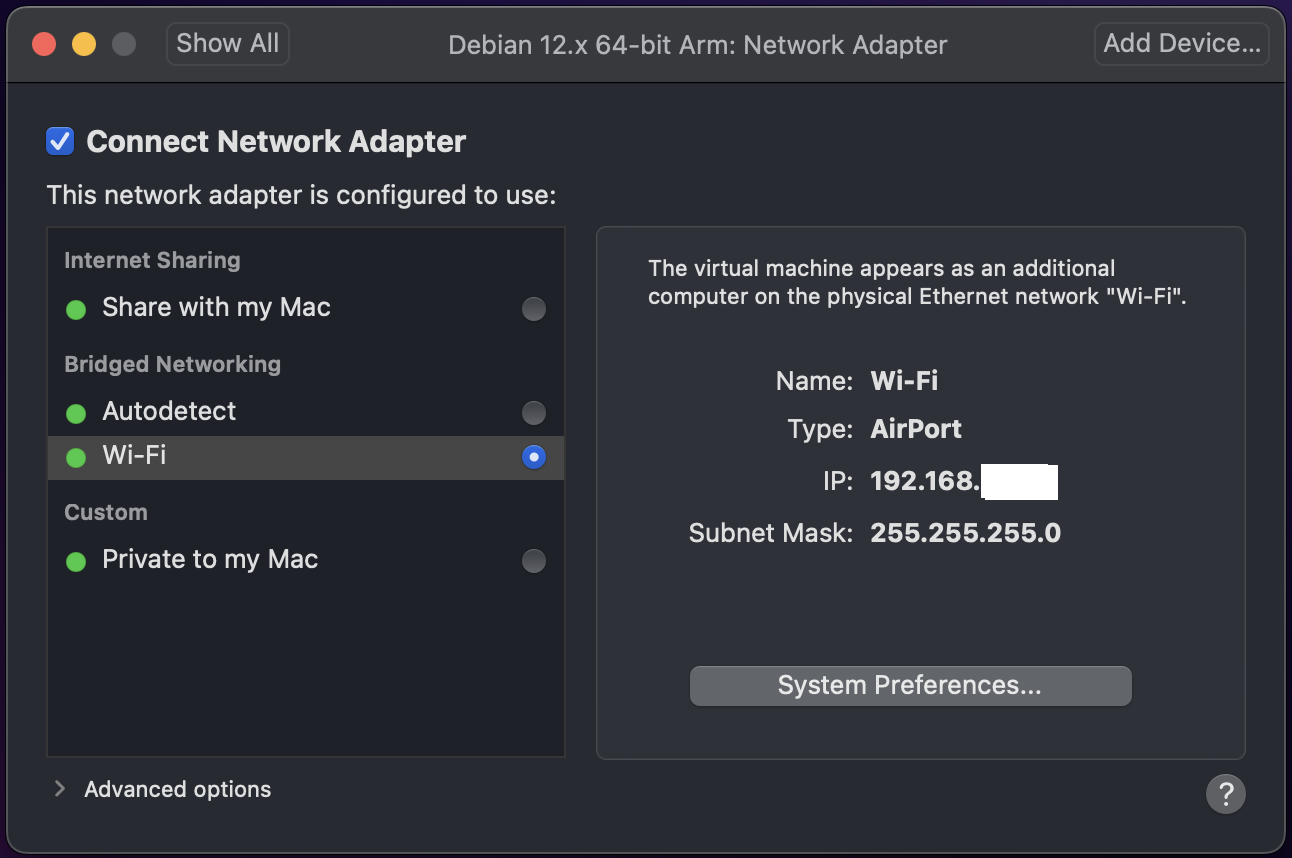
10.14.14.4. For the test purpose, thedebian 12will be assigned as a physical machine, which the Bridged Networking is going to chooseWi-Fi.
- The address of this device is
As the diagram shows that the UDP (User Datagram Protocol) 14321
port is going to assign all throughout the peer-to-peer communication.
1. Create and Initial the WireGuard Server on Google Cloud Platform
This is the Network and Operating System configuration of a VM:
--network-interface=stack-type=IPV4_ONLY,subnet=default \
--create-disk=device-name=wireguard,image=projects/ubuntu-os-cloud/global/images/ubuntu-2204-jammy-v20240112,mode=rw \
Do not attempt to manually open any port on new server so far, such as
80, 443, 51820, and custom ports. The traffic between the peer-to-peer communication is take advantage of the User Datagram Protocol (UDP), and these UDP ports also depend on demand after we started the WireGuard listener process.
1.1. Switch the Role on Google Cloud Platform
In this article, "#" symbol is the command line on Linux.
Before doing the following, make sure the current user is root.
Two steps:
- Change the root password due to its initial environment:
# sudo passwd - After this, switch to root user:
# su root
1.2. Install WireGuard and Generate the Private, Public Key for Remote Server
First, keep the VM up to date, and install the WireGuard as a remote server on Ubuntu 22.
# sudo apt update
# sudo apt install wireguard
After the installation is completed, we can use the built-in commands of WireGuard to generate the private and public key.
wg genkey is for generating the private key.
# wg genkey | sudo tee /etc/wireguard/private.key
# sudo chmod go= /etc/wireguard/private.key
The tee command presents the output of private key on the current console
and at the same time stores it into the target /etc/wireguard/private.key file.
The chmod command will protect the private.key which can only be operated by the current root role.
We have two ways to hold the private key in the future use. One way is that copy the private key to a notebook. Another way is that to duplicate the current session window, when we need to display the private key in the future, we can use
sudo cat /etc/wireguard/private.keyin another duplication window.
Then generating the public key, wg pubkey which is a derivative of the base64 private key.
# sudo cat /etc/wireguard/private.key | wg pubkey | sudo tee /etc/wireguard/public.key
After executed the command, it will be displayed the public.key on the console and stores into /etc/wireguard/public.key file.
Meanwhile, we can switch to the duplication window, execute cat /etc/wireguard/public.key to see it.
The private.key portion denotes the wg pubkey will concatenate the private key and have the public.key derive from it.
1.3. Assign the Addresses for WireGuard Server and Clients
As the network diagram showed before, I prefer to choose the 10.0.0.0 to 10.255.255.255 range of the Reserved Addresses for the peer-to-peer communication.
For the test purpose, starts at 10.14.14.1 to 10.14.14.255 will as all the Reserved Addresses for the tunnel interface.
- 10.0.0.0 to 10.255.255.255 (10/8 prefix)
- 172.16.0.0 to 172.31.255.255 (172.16/12 prefix)
- 192.168.0.0 to 192.168.255.255 (192.168/16 prefix)
1.4. Enable the IP Forwarding Function on WireGuard Server
To edit the /etc/sysctl.conf file using the command below, the command of vim built-in on the current system.
# sudo vim /etc/sysctl.conf
# Uncomment the next line to enable packet forwarding for IPv4
#net.ipv4.ip_forward=1
When open the /etc/sysctl.conf file, first press the i key on the keyboard to enable the insert function.
Move the cursor and remove pound key # before the net.ipv4.ip_forward=1,
and press the ESC key, then press the shift key ⬆️ and holding,
do not release the shift key and press the colon key at the same time.
After this, release the fingers, typing the wq sequentially, and press Enter to save the file and exit editing.
To check the ip_forward for ipv4 whether updated or not.
# sudo sysctl -p
After this command, the console will be displayed net.ipv4.ip_forward = 1, subsequently, the IPv4 forward is enabled.
1.5. Create the WireGuard Server Configuration File
# sudo vim /etc/wireguard/wg0.conf
When we are executing the vim command, if the file of target is existed, the command is just editing the target.
Otherwise, it will help us creates a new file which name is wg0.conf in the /etc/wireguard/ directory.
[Interface]
PrivateKey = sudo cat /etc/wireguard/private.key on WireGuard server
Address = 10.14.14.1/24
ListenPort = 14321
SaveConfig = true

PostUp = iptables -t nat -I POSTROUTING -o ens4 -j MASQUERADE
PreDown = iptables -t nat -D POSTROUTING -o ens4 -j MASQUERADE
In 1.2. we have created the private.key.
Switch to the duplication window,
execute sudo cat /etc/wireguard/private.key copy and paste it to after PrivateKey =,
keep a space between the = and private.key.
The Address and ListenPort replace to your preferred parameters.
We need to replace two fields under SaveConfig = true that name is ens4, if running on non-Google Cloud Platform.
The ip route can help us find the network interface, after the dev is our interface name:
root@wireguard:~# ip route list default
default via 10.0.0.1 dev ens4 proto dhcp src 10.0.0.6 metric 100
Make sure copy the text from [Interface] to last PreDown into the /etc/wireguard/wg0.conf file,
and replace the PrivateKey, Address, ListenPort to your own, then save and exit.
Again, we are able to executing sudo cat /etc/wireguard/wg0.conf
to verify if the wg0.conf file similar to above but only differ with the variation portion.
As the
1.1. Switch the Role on Google Cloud Platformbefore said, the ports of tunnel were on demand the listener process starts. In the other words, we do not need toufwto manage the ports unless you would like to restrict the range of ports, this command# ufw statuscan see the status of ufw, I recommended keeping itStatus: inactive.
1.6. Enable and Start the WireGuard Server
The enable will have the WireGuard become a daemon process,
and it will automatically enable the wg-quick service while it is rebooting the system.
wg0 is our configuration file in /etc/wireguard/wg0.conf.
# sudo systemctl enable [email protected]
# sudo systemctl start [email protected]

# sudo systemctl status [email protected]
Sequential executing enable and start, the status will display the basic information about the wg0.conf.
Attention to the `ip link set mtu 1380 up dev wg0`.
We have to set all the clients matching the mtu value same with WireGuard server
due to we are running on the Google Cloud Platform.
The mtu will cause network unstable if it is not matching with 1380 when a client
(masquerade) visiting the Google products.
I got an inspiration from this issue WireGuard hosted on GCP cannot access Google and many other sites #1552.
Yet I declared all the MTU value of clients to 1380.
The
mtuis the abbreviation code of theMaximum Transmission Unit.
A configuration file macos_peer.conf is an example
of declare an MTU value in title 2.
We also have stop and restart commands depend on our demands.
# sudo systemctl stop [email protected]
# sudo systemctl restart [email protected]
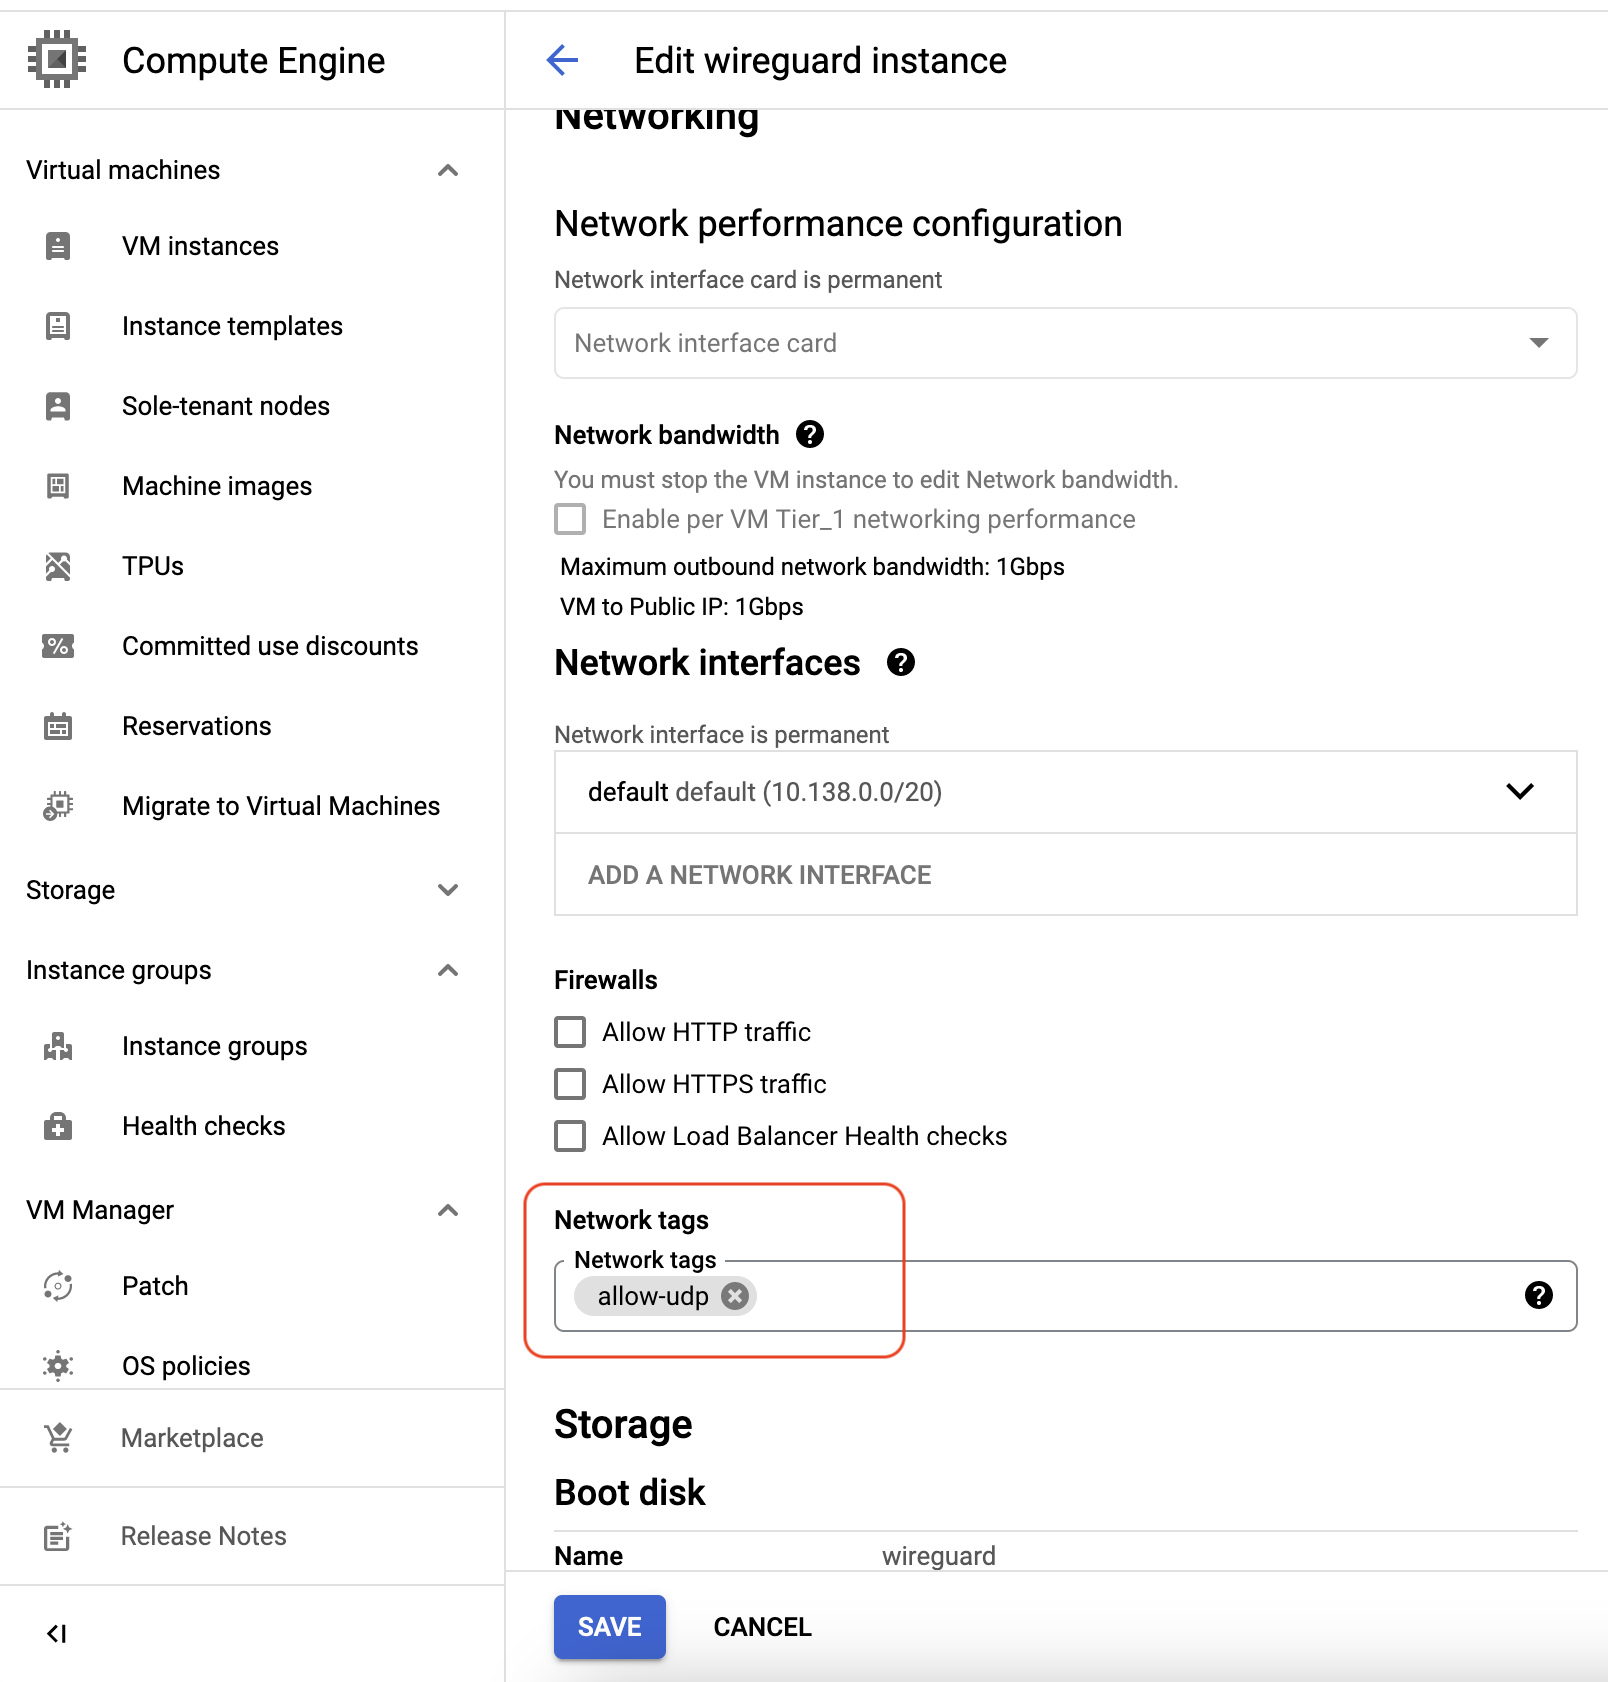
1.7. Create Firewall Rule for WireGuard Server on Google Cloud Platform
We must let the UDP come into WireGuard server, and the firewall rule in the VPC network category.
This is a link Create a firewall rule on Google Cloud setting page.
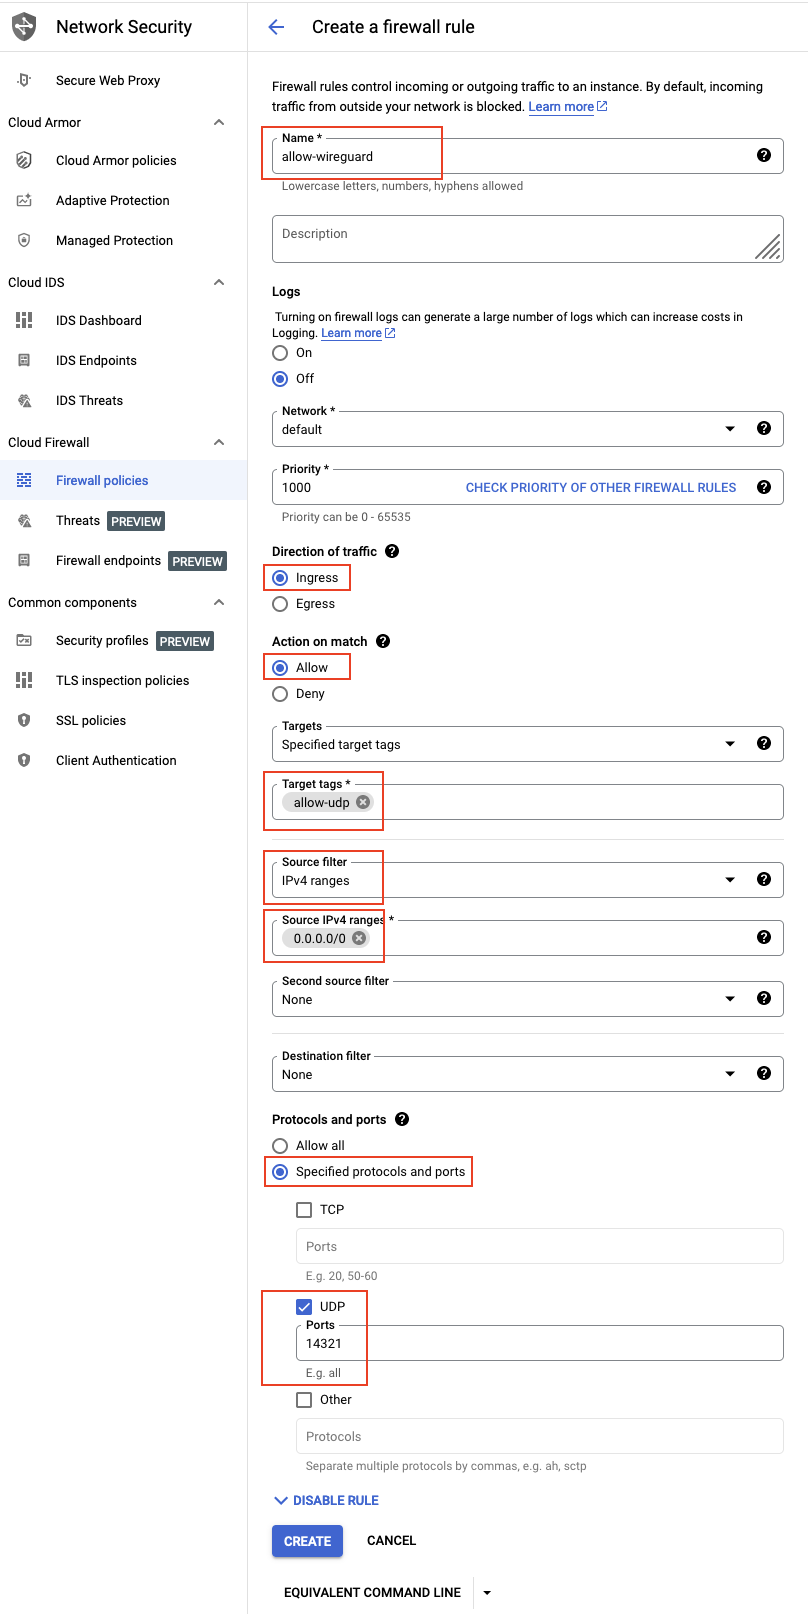
After we have done that Create a firewall rule, and save the allow-udp tag’s name in Target tags* category,
then add allow-udp into a VM instance which has been created.
Enter into a VM instance that also as our WireGuard server, and click EDIT button,
then scroll down to Network tags typing the allow-udp
that just created a name of the firewall rule in Target tags* field,
and click SAVE button.
2. Have the macOS Platform Connect With WireGuard Server
We still need to continue work on the Ubuntu, and the next step is going to generate the configuration file for macOS platform.
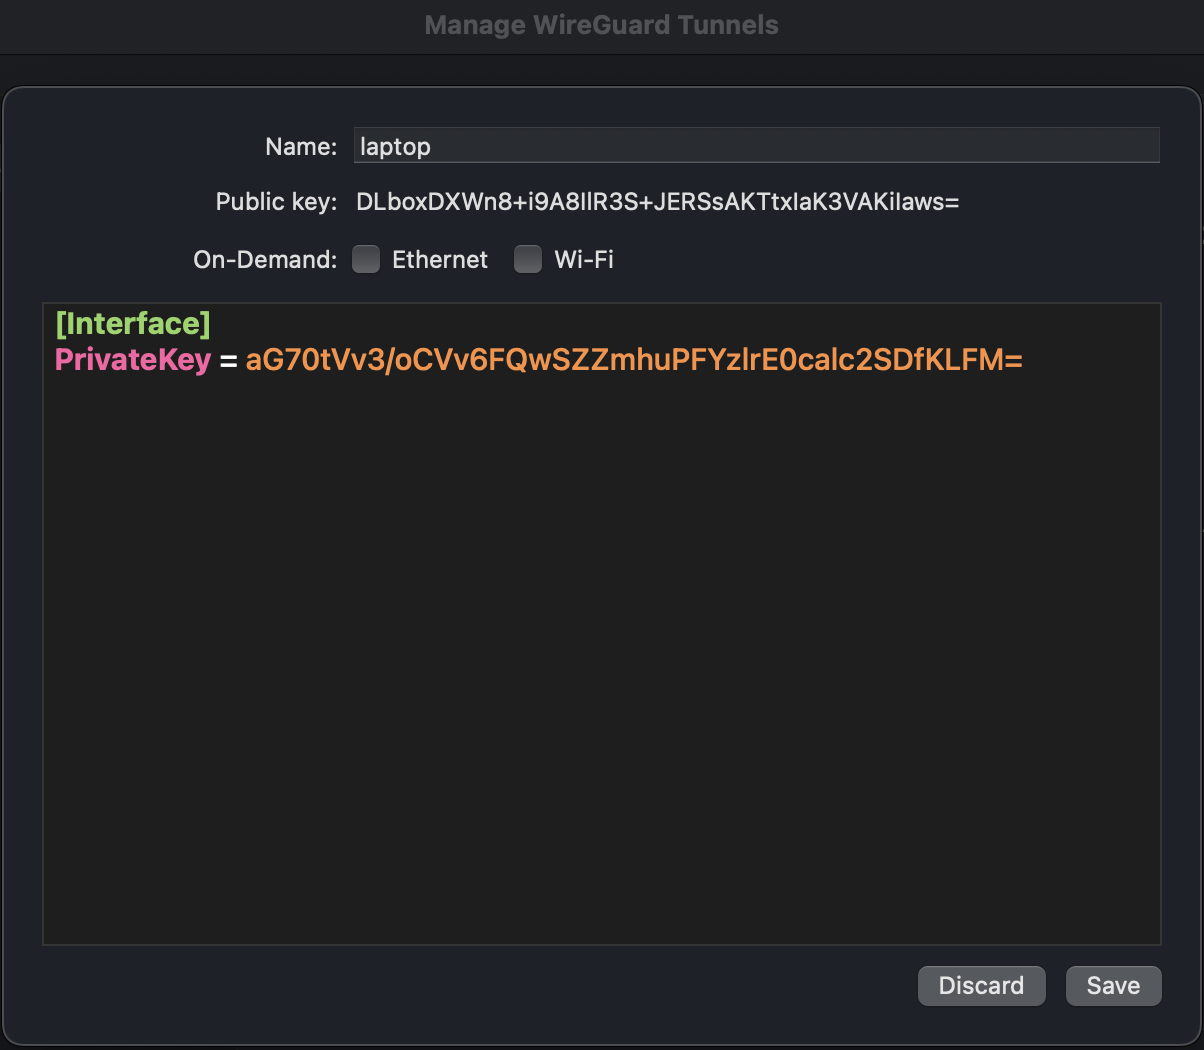
2.1. Generate the Pair Keys and Configuration File for macOS Platform
The scene goes back to generating the public.key and private.key for this WireGuard server,
yet the object changes to the macOS platform.
# wg genkey | sudo tee /etc/wireguard/macos_private.key | wg pubkey | sudo tee /etc/wireguard/macos_public.key
This action will generate two new key files, macos_private.key and macos_public.key.
We can display the count of files in /etc/wireguard/ through execute ls /etc/wireguard/ to see the commands are succeeded.
Create the conf file for macOS platform.
# sudo vim /etc/wireguard/macos_peer.conf
macos_peer.conf
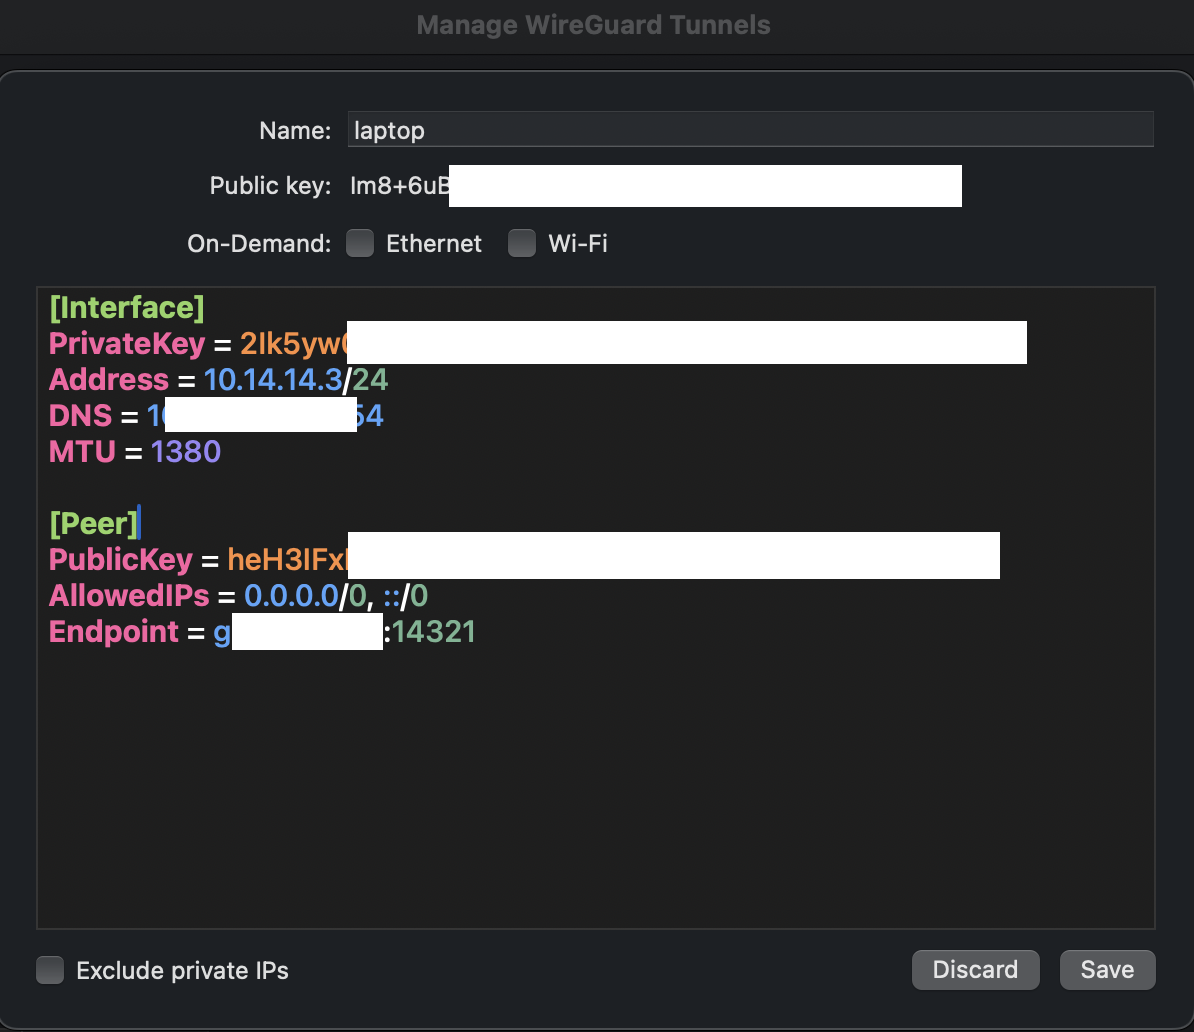
[Interface]
PrivateKey = cat /etc/wireguard/macos_private.key on WireGuard server
Address = 10.14.14.3/24
DNS = 169.1.1.1
MTU = 1380

[Peer]
PublicKey = cat /etc/wireguard/public.key on WireGuard server
AllowedIPs = 0.0.0.0/0, ::/0
Endpoint = WireGuard Server External IP:14321
On the macOS side, the WireGuard server is the [Peer] part.
Running this cat /etc/wireguard/macos_private.key in the duplication session window,
and copy the private key for macOS and replace the parameter after PrivateKey = .
The 10.14.14.3/24 is reserved address of macOS chose as the network diagram showed before.
With more smoothly communicating with WireGuard server, and we’d better explicit the server’s DNS on any clients.
Executing the command of below to display the server’s DNS,
and replace the parameter after DNS = in macos_peer.conf.
In 1.5. portion, ip route list default can help us find the network interface that name is ens4.
If any value that was different with ens4 after executed the ip route list default, replace the ens4 below to your current value.
# sudo resolvectl dns ens4
We have to explicit `MTU = 1380` on all clients to match our `mtu` value on WireGuard server.
Display the mtu value again through this command below on Ubuntu (WireGuard server):
# sudo systemctl status [email protected]
The portion of [Peer] is our WireGuard server,
and display the public.key of server through executing
cat /etc/wireguard/public.key and replace the parameter after PublicKey = .
Keep the AllowedIPs = 0.0.0.0/0, ::/0.
The Endpoint is the external IPv4 of WireGuard server.
The command below can get the value, or see the GCP platform to get the external IP of your WireGuard server.
# curl -4 icanhazip.com
2.2. Add the Public Key of macOS Client to WireGuard Server (Registration)
The configuration file of macOS client is all set.
The next step is going to add the macos_public.key to WireGuard server.
Through executing cat /etc/wireguard/macos_public.key can get the public key of macOS and
replace the parameter that is xxx, which the location is after peer but before the allowed-ips.
After allowed-ips is a reserved address assigned as 10.14.14.3,
or choose your preferred, but this address must be same with this Address field in macos_peer.conf file.
# sudo wg set wg0 peer xxx allowed-ips 10.14.14.3
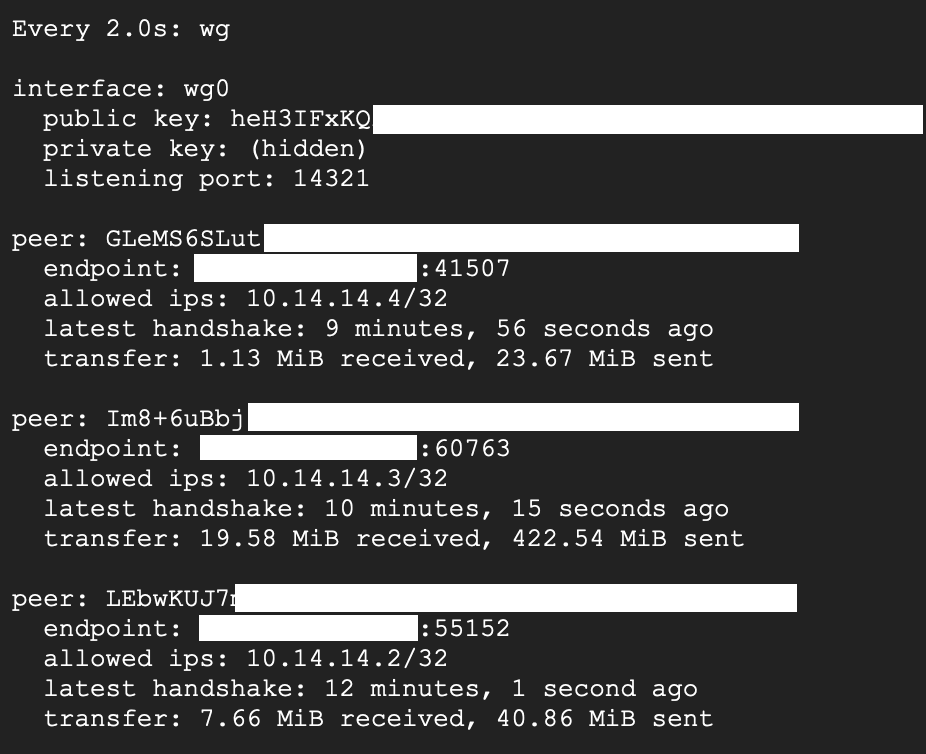
Right now we can use watch wg to view the real time of wg on WireGuard server.
# watch wg
2.3. Have the macOS Client Connecting With WireGuard Server
I have the WireGuard for macOS installed. This is a download link on Apple Store if you do not have it.
Open the WireGuard GUI on macOS, Add Empty Tunnel, and choose a name for this tunnel.
Do not type or modify the Public and Private key, and we do not use this.
Meanwhile, it is an automatically preset generation action.
Go back to the WireGuard server, and executing cat /etc/wireguard/macos_peer.conf,
then copy after the [Interface] contents, paste to the WireGuard mscOS GUI.
# cat /etc/wireguard/macos_peer.conf
As the above of the macOS GUI,
and through paste the contents that from our executed the cat /etc/wireguard/macos_peer.conf
on Ubuntu (WireGuard server).
Next replace after the [Interface] in the above of the macOS GUI,
and please attention to replace the parameters to your own values:
Soon the macOS GUI configuration looks like this:
Save and Active this tunnel, and find some kinds of IP Lookup tools to verify our masquerade.
We can execute through curl -4 icanhazip.com command
on macOS Terminal to verify we have been connected our remote server (WireGuard Server).
However, people who live in PRC hell may need to a CDN proxying the external IP of WireGuard server to bypass the censorship from the communist bandits. The image below is the DNS proxying with help of the Cloudflare [DNS Proxying With Help Cloudflare]
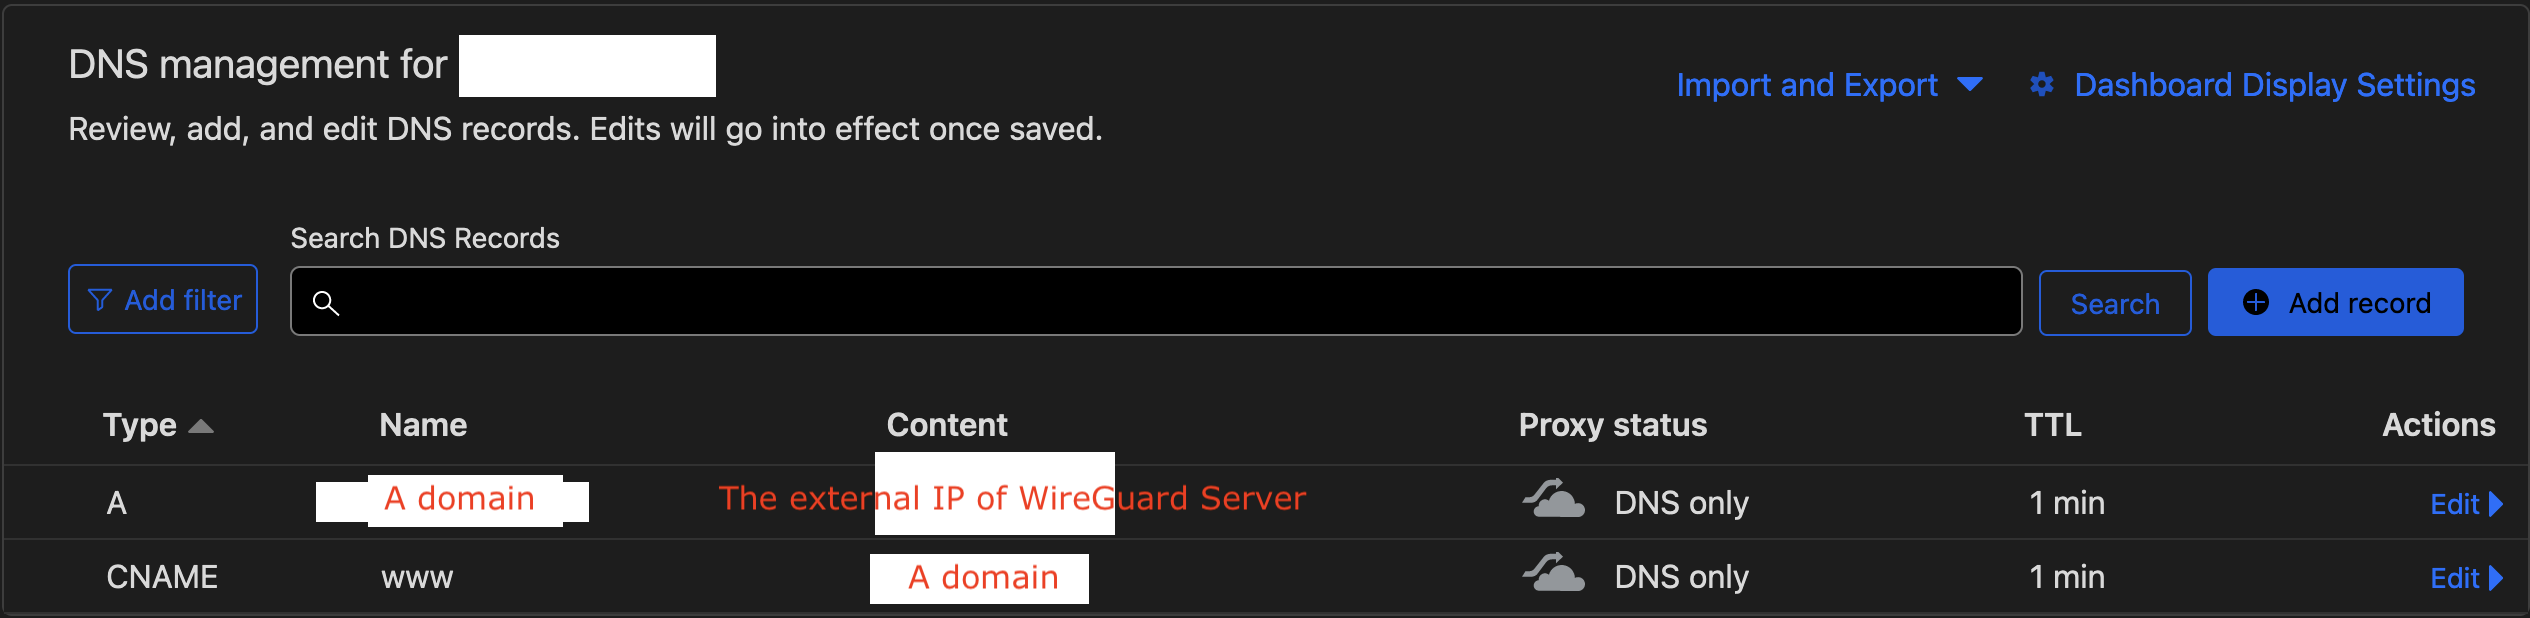
If we with the help of Cloudflare proxying the external IP of the WireGuard server,
and the Endpoint can be replaced to Endpoint = domain:14321.
Otherwise, this bare external IPv4 works in PRC hell.
3. Connecting the Cellphone With the WireGuard Server
We still need to continue work on the Ubuntu (WireGuard server). The next step is going to generate the configuration file for cellphone, and the actions that are similar to generated files for macOS platform.
3.1. Generate the Pair Keys and Configuration File for a Cellphone
This time, the object changes to a cellphone.
# wg genkey | sudo tee /etc/wireguard/phone_private.key | wg pubkey | sudo tee /etc/wireguard/phone_public.key
The action that above will generate two files in /etc/wireguard/ directory, phone_private.key and phone_public.key.
In 2.1. has more details about the pair keys.
Create the conf file for a cellphone.
# sudo vim /etc/wireguard/phone_peer.conf
phone_peer.conf
[Interface]
PrivateKey = cat /etc/wireguard/phone_private.key on WireGuard server
Address = 10.14.14.2/24
DNS = 169.1.1.1
MTU = 1380

[Peer]
PublicKey = cat /etc/wireguard/public.key on WireGuard server
AllowedIPs = 0.0.0.0/0, ::/0
Endpoint = WireGuard Server External IP:14321
As the Network Diagram example mentioned, the 10.14.14.2 assigned to the cellphone.
In phone_peer.conf file, the steps that get the values of the DNS, MTU and the contents after [Peer] same with
2.1. Generate the Pair Keys and Configuration File for macOS Platform.
3.2. Add the Public Key of Cellphone to WireGuard Server (Registration)
The next step is going to add the phone_public.key to WireGuard server.
Through executing cat /etc/wireguard/phone_public.key can get the public key of cellphone
and replace the parameter that is xxx, which the location is after peer but before the allowed-ips.
After allowed-ips is a reserved address assigned as 10.14.14.2,
or choose your preferred, but this address must be same with this Address field in phone_peer.conf file.
# sudo wg set wg0 peer xxx allowed-ips 10.14.14.2
3.3. Have the Cellphone Connecting With WireGuard Server
Our cellphone configuration file in /etc/wireguard/phone_peer.conf directory on WireGuard server,
and It’s ready to use.
In this article we have two ways to have the cellphone link to our WireGuard server,
and both ways can be gotten same result.
- 1: With the help of
qrencode:
# sudo apt install qrencode
- 1: Command that below is that rendering our
phone_peer.confto a QR code, and take your phone and open the WireGuard for cellphone. Add a new tunnel via theCreate from QR code, and invoke the camera of this cellphone to scan the QR code on this WireGuard server, then we can get the cellphone peer.
# sudo cat /etc/wireguard/phone_peer.conf | qrencode -t ansiutf8
-
2: This way is a little bit complicated, we may need to prepare some kinds of
iCloud Drive,drive.googleor your own servers. -
2: Open a new window in a notebook, and executing
cat /etc/wireguard/phone_peer.confin WireGuard server, and copy the contents that after the command is executed to the new window in the notebook, then save tophone_peer.conffile format. Upload this file to some kinds of Cloud or somewhere that you feel is a safe place, then you can make the file download to the cellphone. -
2: After done above, open the WireGuard for cellphone, add a new WireGuard tunnel, choose the
Create from file or archive, and find thephone_peer.conffile that you have downloaded fromCloudto your cellphone.
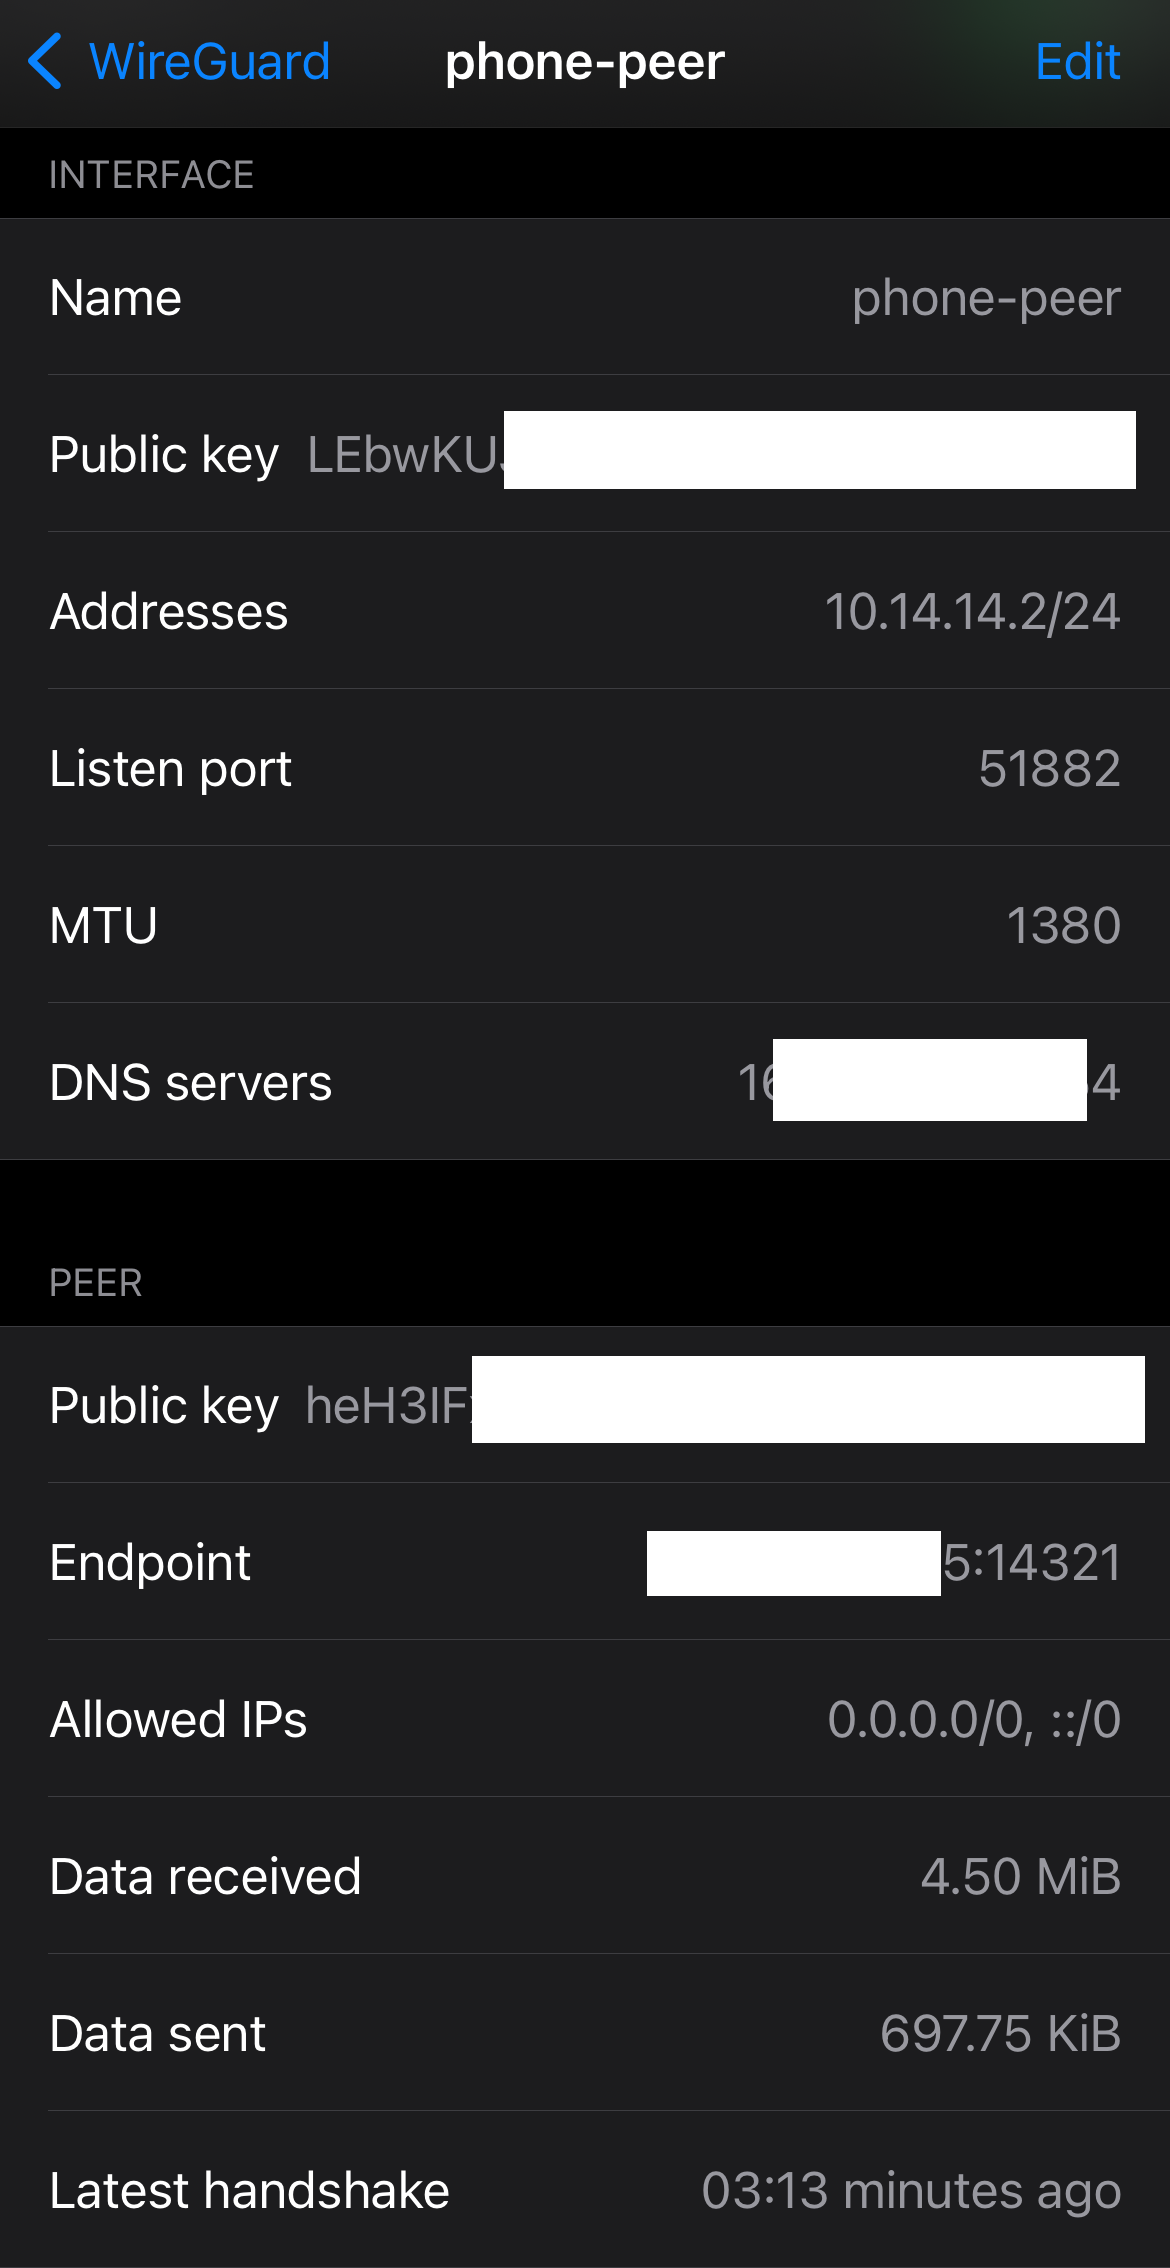
There will have two clients appeared in the console on WireGuard server if you have connected to the VPN server.
# watch wg
4. Make the Debian 12 Communicate With WireGuard Server
Switch the current role to root on Debian 12 before doing the following actions, and the steps same as
1.1. Switch the Role on Google Cloud Platform.
4.1. Generate the Pair Keys for Debian 12
Initial and install WireGuard on Debian similar to we were working in on the WireGuard server.
Yet we do not need to do steps as many as WireGuard server, and only generate the private and public key for Debian peer on Debian 12.
First, keep the Debian 12 up to date, and install the WireGuard on Debian 12.
# sudo apt update
# sudo apt install wireguard
Generate the private and public key, and wg genkey is for generating the private key.
# wg genkey | sudo tee /etc/wireguard/private.key
# sudo chmod go= /etc/wireguard/private.key
The chmod command will protect the private.key which can only be operated by the current root role on Debian.
Then generating the public key, and wg pubkey is a derivative of the base64 private key.
# sudo cat /etc/wireguard/private.key | wg pubkey | sudo tee /etc/wireguard/public.key
After the command executed above,
executing ls /etc/wireguard/ we can see two files.
One is for self-holding of Debian 12,
and the public key is for registering into WireGuard server.

4.2. Create the Configuration File for Debian
Right now we still stay in on Debian 12.
I am familiar with vim editor on Linux, and you can choose your preferred.
# sudo apt install vim
Create the wg0.conf file on Debian 12:
# sudo vim /etc/wireguard/wg0.conf
[Interface]
PrivateKey = sudo cat /etc/wireguard/private.key on Debian 12
Address = 10.14.14.4/24
DNS = 169.1.1.1
FwMark = 14321
MTU = 1380
[Peer]
PublicKey = cat /etc/wireguard/public.key on WireGuard server
AllowedIPs = 0.0.0.0/0, ::/0
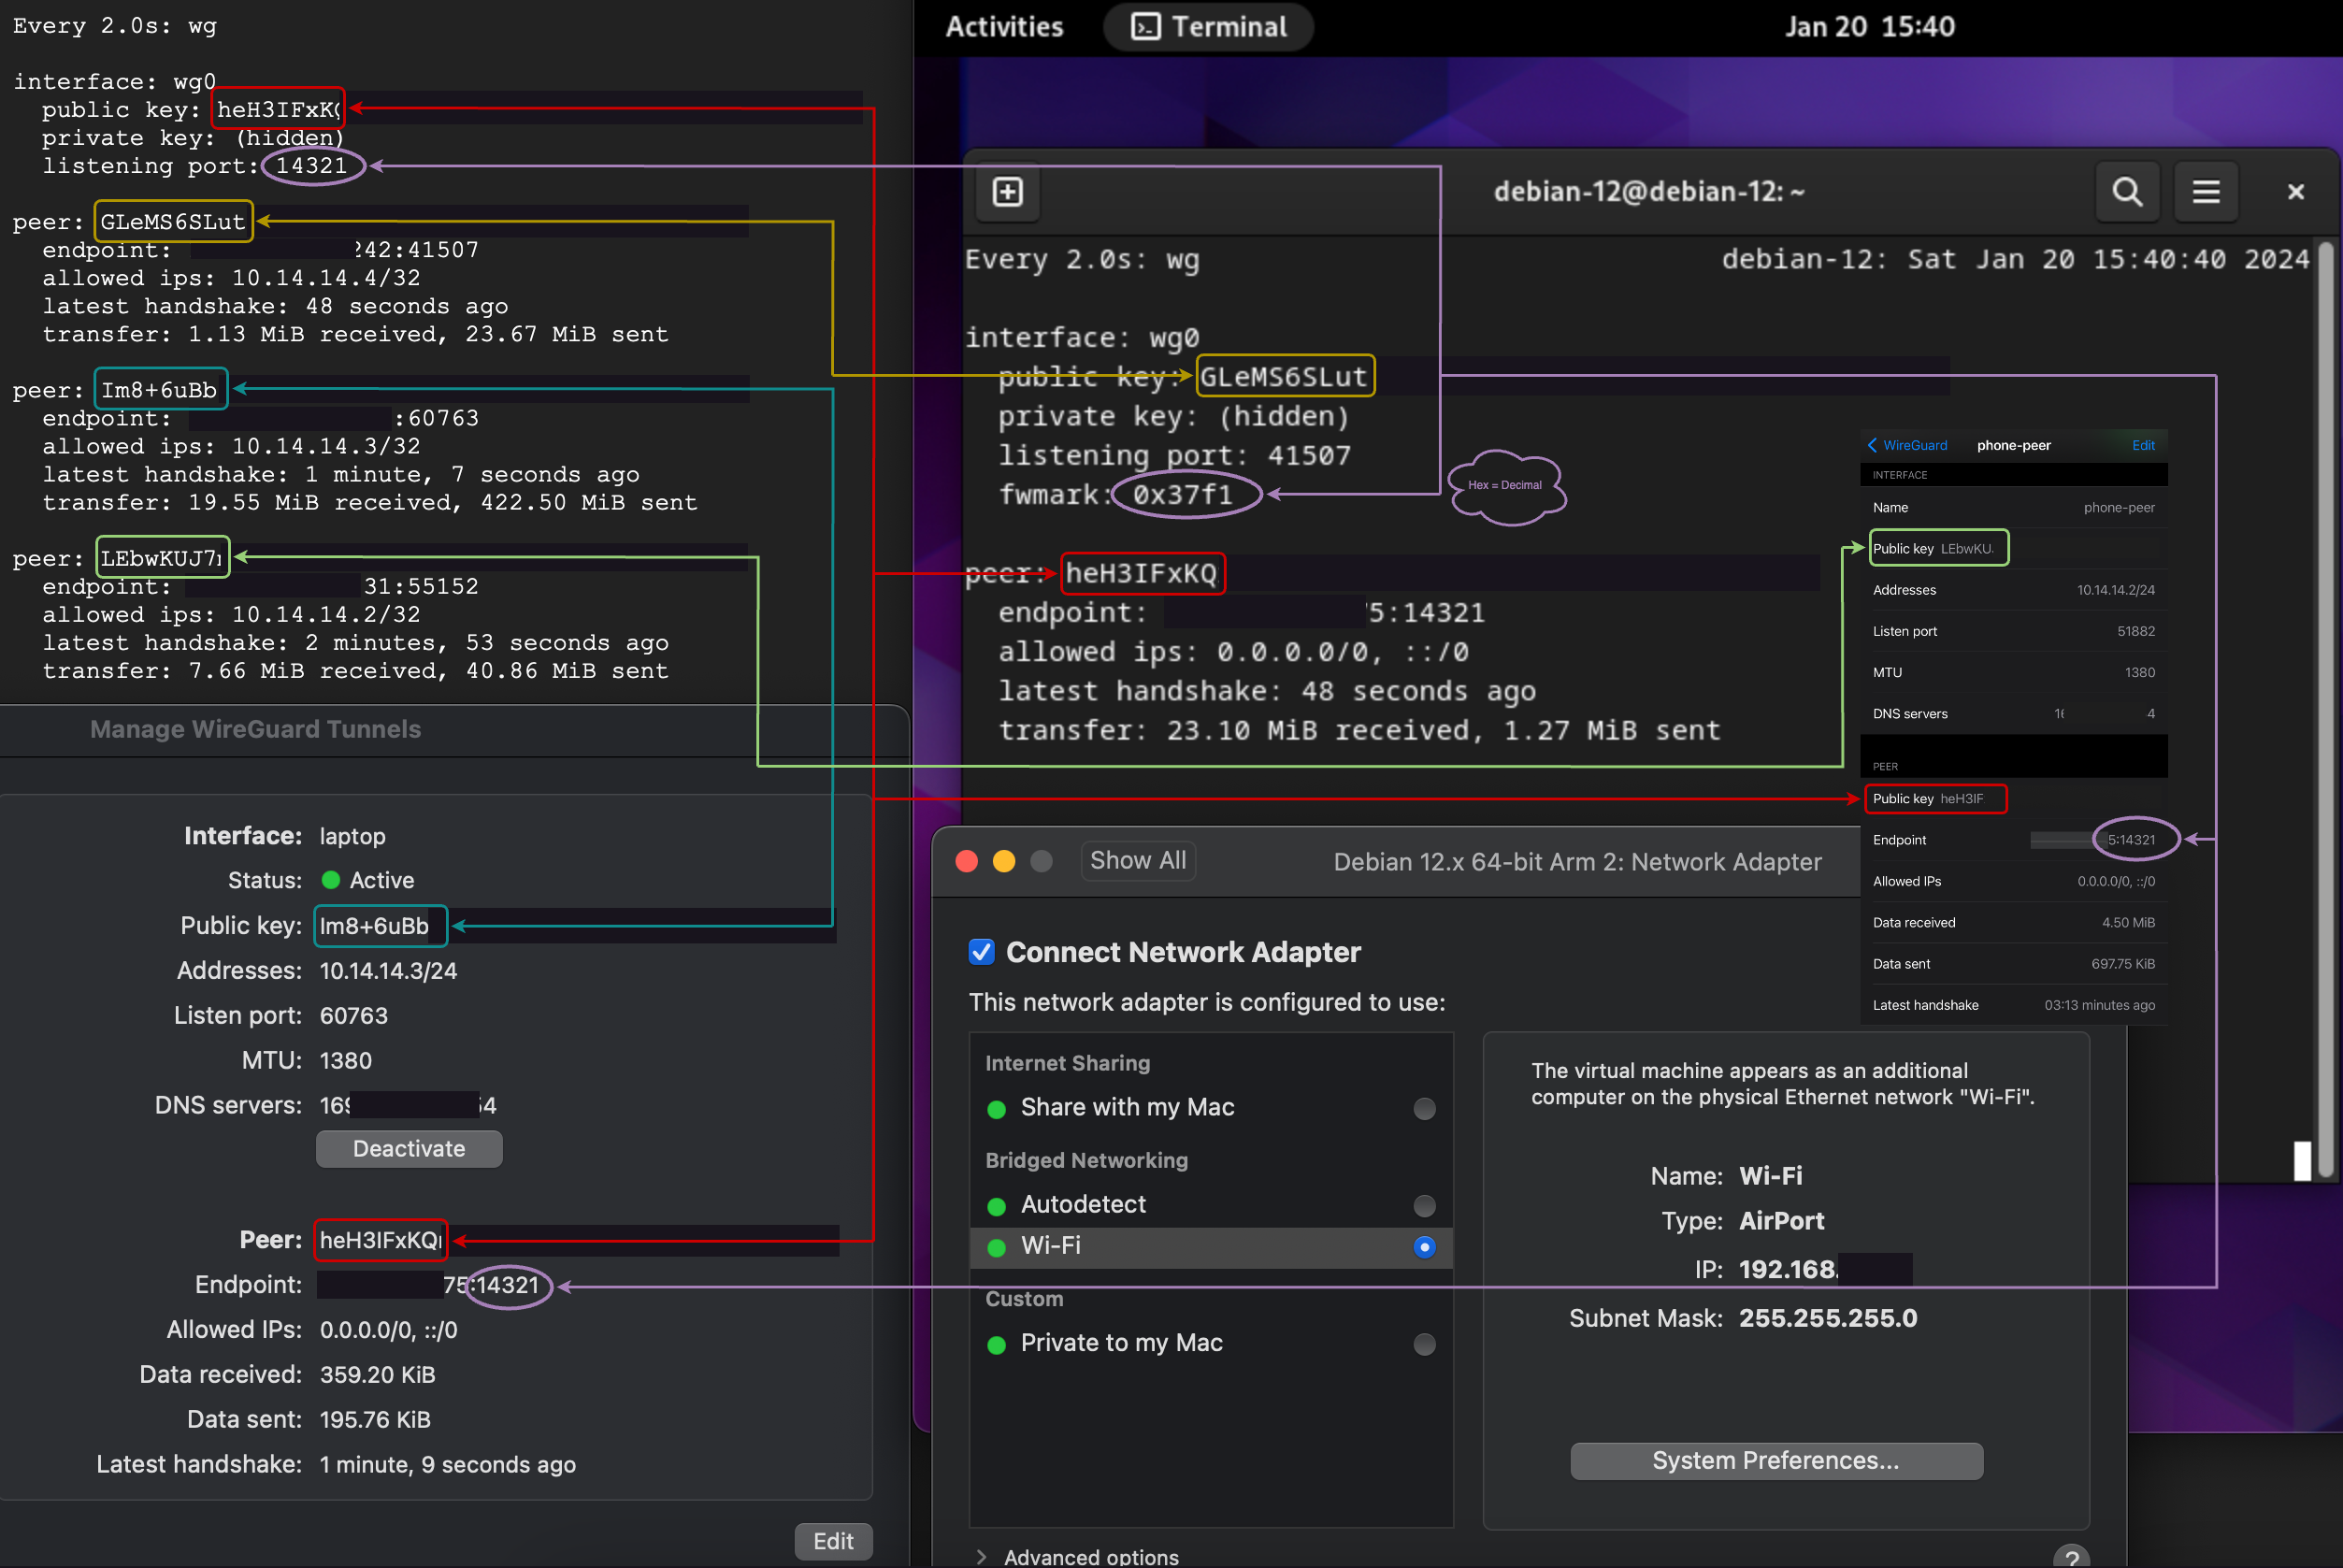
Endpoint = WireGuard Server External IP:1432110.14.14.4 is assigned to Debian as the network diagram showed before.
PrivateKey is read the local private key on Debian,
and not read the private key on WireGuard server.
The DNS and MTU same with the values of macOS or Cellphone.
FwMark is the abbreviation code of the Firewall marks.
WireGuard default employs Hexadecimal (0xCA6C) equals to Decimal (51820)
for the communication port if we are not explicit the specific port.
On the Debian side, [Peer] is the WireGuard server.
The portion of [Peer] keep same with the macOS or Cellphone.
After completed done above, we can view the wg0.conf via
root@debian-12:~# cat /etc/wireguard/wg0.confon Debian 12.
4.3. Start the WireGuard Process on Debian to Connect the Remote WireGuard Server
We are all set for the wg0.conf on Debian,
and start the process can make connection with the remote server (WireGuard Server).
For connecting through wg-quick up wg0 with WireGuard Server.
# sudo wg-quick up wg0
When we’re executing sudo wg-quick up wg0 on Debian, and we may encounter resolvconf: command not found error.
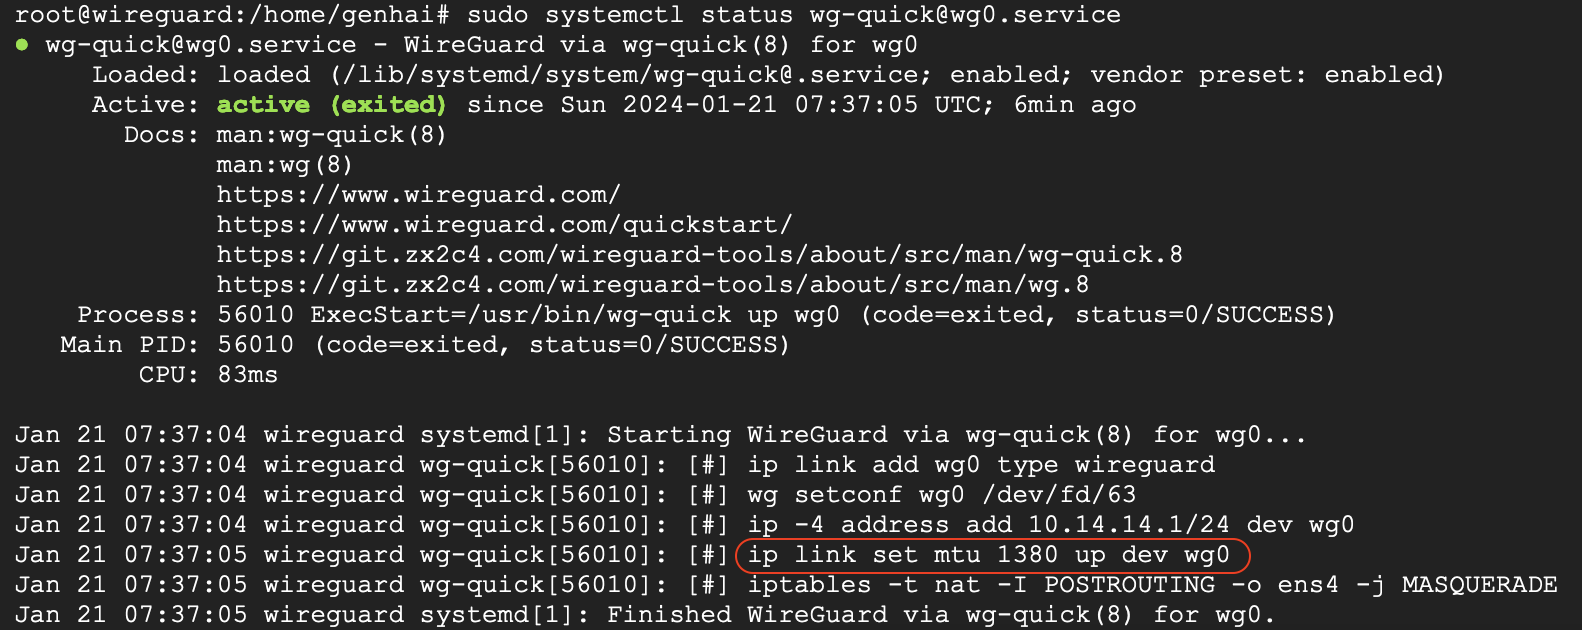
root@debian-12:~# sudo wg-quick up wg0
[#] ip link add wg0 type wireguard
[#] wg setconf wg0 /dev/fd/63
[#] ip -4 address add 10.14.14.4/24 dev wg0
[#] ip link set mtu 1380 up dev wg0
[#] resolvconf -a tun.wg0 -m 0 -x
/usr/bin/wg-quick: line 32: resolvconf: command not found
[#] ip link delete dev wg0
Based on line 32: resolvconf: command not found, and we need to install the resolvconf to resolve this error.
root@debian-12:~# sudo apt install resolvconf
After that, executing sudo wg-quick up wg0 again, and we can get the information below in console on Debian.
root@debian-12:~# sudo wg-quick up wg0
[#] ip link add wg0 type wireguard
[#] wg setconf wg0 /dev/fd/63
[#] ip -4 address add 10.14.14.4/24 dev wg0
[#] ip link set mtu 1380 up dev wg0
[#] resolvconf -a tun.wg0 -m 0 -x
[#] ip -6 route add ::/0 dev wg0 table 14321
[#] ip -6 rule add not fwmark 14321 table 14321
[#] ip -6 rule add table main suppress_prefixlength 0
[#] nft -f /dev/fd/63
[#] ip -4 route add 0.0.0.0/0 dev wg0 table 14321
[#] ip -4 rule add not fwmark 14321 table 14321
[#] ip -4 rule add table main suppress_prefixlength 0
[#] sysctl -q net.ipv4.conf.all.src_valid_mark=1
[#] nft -f /dev/fd/63
Confirm the IP -4 addresses, Port (fwmark), and the value of mtu as our expected.
For Debian 12 disconnecting through wg-quick down wg0 with WireGuard Server.
# sudo wg-quick down wg0
4.4. Add the Public Key of Debian to WireGuard Server (Registration)
Switching to WireGuard server before, executing cat /etc/wireguard/public.key on Debian to get the public key of it,
and the steps same with the 3.2. Add the Public Key of Cellphone to WireGuard Server (Registration).
The next step is switch to WireGuard server to execute the command below, remember to replace the public key (xxx).
# sudo wg set wg0 peer xxx allowed-ips 10.14.14.4
Eventually, it will be shown the connected peers when we’re using # watch wg on WireGuard server.
5. Conclusion
Based on this GCP (Google Cloud Platform) example, the major difference compare with other VPS providers is
that we have to explicit MTU (Maximum Transmission Unit) value in the configuration file of each peer (client).
Importantly, we need to manually open 14321 port for a WireGuard server in the webpage on Google Cloud Platform.
In other words,
the authority of ports management in the webpage on Google Cloud Platform is higher than ufw command on Linux.