Customize a Jekyll Blog to Automatically Deploy and Release on Linux
The GitHub Pages for free to use the github.io domain hosting users blog,
but user has to keep the repository public.
To keep repository private, user needs consider becoming a Professional account.
If you've prepared a server and domain in advance. In this article, we can set the GitHub Pages repository to private regardless of whether the GitHub account is a Pro or not. Of course, you can create a normal repository for your Jekyll and set to private.
We will customize a server for the Jekyll blog on Linux, and let the GitHub repository link to the server. After each commit to the GitHub, go to the server and execute the script that at the end of this article, which can automatically deploy and release a Jekyll blog.
Because this article is a tutorial for build an automation script to deploy the Jekyll. If you are first time familiar with the Jekyll blog, I recommend that you should read GitHub Pages tutorial first, it is explained how to host a website from your GitHub repository.
The
github.iocannot deliver the contents to around the world, which mostDNSwill be parsed to the Europe and North America. If your visitors live in PRC hell, during they’re visiting your site, the bandits will pollute the traffic between your site that hosting onGitHub Pagesand your clients. At the end of this article, we will choose a free CDN, which could solve the unacceptable circumstance.
Let’s get into it.
In this article, "#" symbol is the command line on Linux, "---" is the command comments.
First of all, create a Linux server, we use CentOS Stream 8 for example:
# cat /etc/os-release

NAME="CentOS Stream"
VERSION="8"
ID="centos"
ID_LIKE="rhel fedora"
VERSION_ID="8"
PLATFORM_ID="platform:el8"
PRETTY_NAME="CentOS Stream 8"
ANSI_COLOR="0;31"
CPE_NAME="cpe:/o:centos:centos:8"
HOME_URL="https://centos.org/"
BUG_REPORT_URL="https://bugzilla.redhat.com/"
REDHAT_SUPPORT_PRODUCT="Red Hat Enterprise Linux 8"
REDHAT_SUPPORT_PRODUCT_VERSION="CentOS Stream"
Before doing the following, make sure the current user is root.
Two steps:
- Change the root password if you are on non-root user:
# sudo passwd --- or --- # sudo passwd root - After this, switch to root user:
# su root
Before copy the GitHub repository to Linux server,
check the Git and install it if it’s not included.
CentOS install command is yum:
# yum install git

--- check it status after installed ---
# git --version
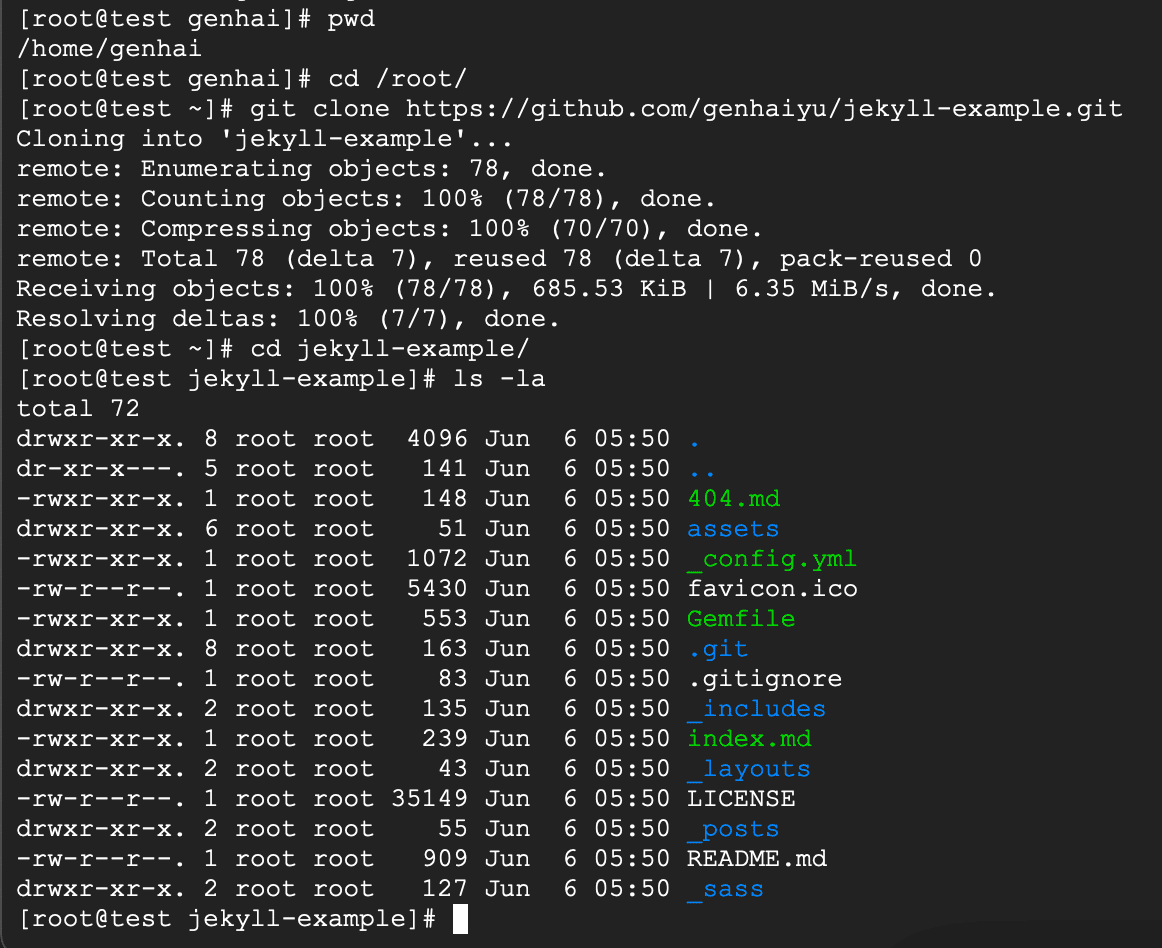
For test purpose, we need an example repository. This is an example repository for build test, you can choose your preferred. Don’t do any path change actions after cloning it to a Linux server, the script needs to build in the repository directory.
# git clone https://github.com/genhaiyu/jekyll-example
Once we clone the repository to a server, we need to do a few steps:
- Use
RVMmanager theRuby - Use
Rubybuild the Jekyll - Use
Nginxproxy the website that has been built
Install RVM before,
import the handshake key of the RVM, gpg2 build-in the CentOS 8. Ubuntu and CentOS 7 are gpg:
# gpg2 --keyserver keys.openpgp.org --recv-keys 409B6B1796C275462A1703113804BB82D39DC0E3 7D2BAF1CF37B13E2069D6956105BD0E739499BDB
If on the CentOS 7 and Ubuntu:
# gpg --keyserver hkp://keyserver.ubuntu.com:80 --recv-keys 409B6B1796C275462A1703113804BB82D39DC0E3 7D2BAF1CF37B13E2069D6956105BD0E739499BDB
If you concern the security of the handshake keys, move to the official RVM key portion.
And install a stable version of the RVM:
# curl -sSL https://get.rvm.io | bash -s stable
Refresh and execute an extension of the rvm script in the current shell environment:
# source /etc/profile.d/rvm.sh
Before install Ruby, there are some commands could be displayed about the command information of the RVM,
and Ruby versions.
rvm help is for more details:
# rvm list known
After executing the command of above, it will show the versions of Ruby on below.
In this article, we are designed to install the stable version of Ruby is 3.1.0, but it didn’t show that.
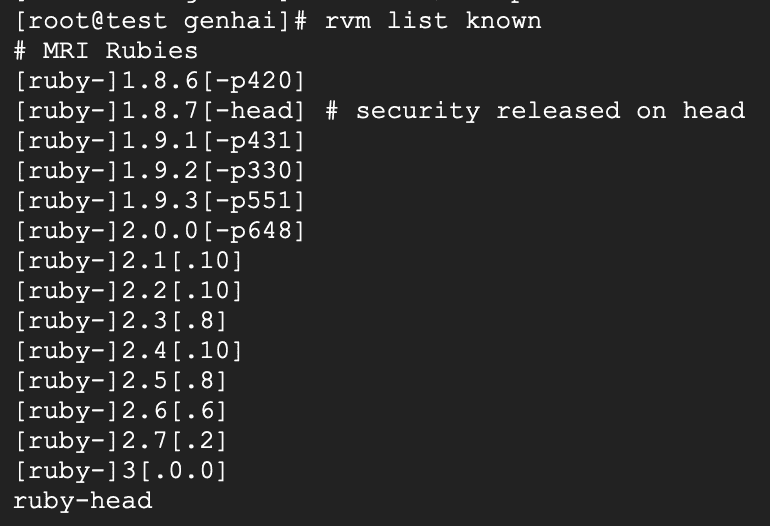
The newest version is ruby-head,
we need to move to the RVM official to verify:
According to the NOTE: in above, we can continue running installation action:
# rvm install 3.1.0
The 3.1.0 version compatible with many versions of Linux without an error while I was tested. Such as Ubuntu 20+, CentOS 7,8, they are all x86/64 architectures.
Then assign the new Ruby version override the current environment:
# rvm use 3.1.0

--- more info ---
# rvm list
For now, we already have an essential environment for build Jekyll, let’s check the Ruby and Gem:
# ruby -v
# gem -v
We have ability to install Jekyll now:
# gem install bundler jekyll
Move the path to the directory of Jekyll blog which is about to build.
# cd jekyll-example/
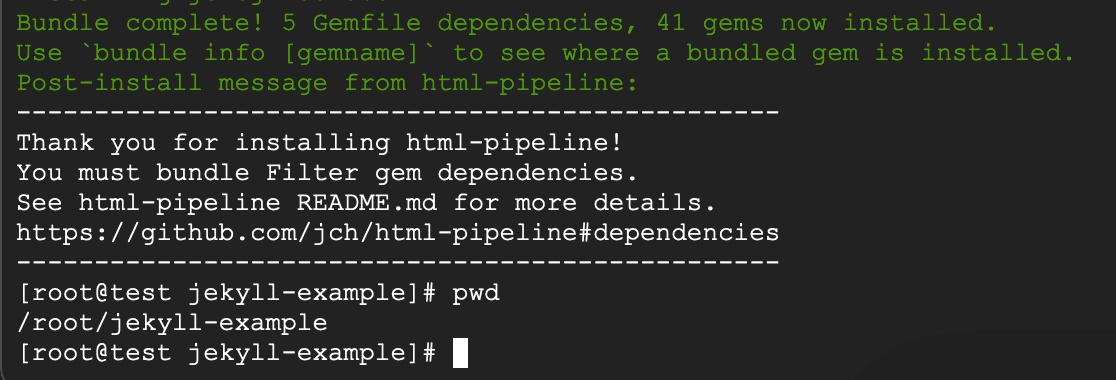
Keep in the directory, execute the bundle command:
# bundle install
Try to build a site, /root/jekyll-example this path is output folder that equivalent output to current directory,
which mean _site folder will be generated in the same directory:
# jekyll build --source /root/jekyll-example
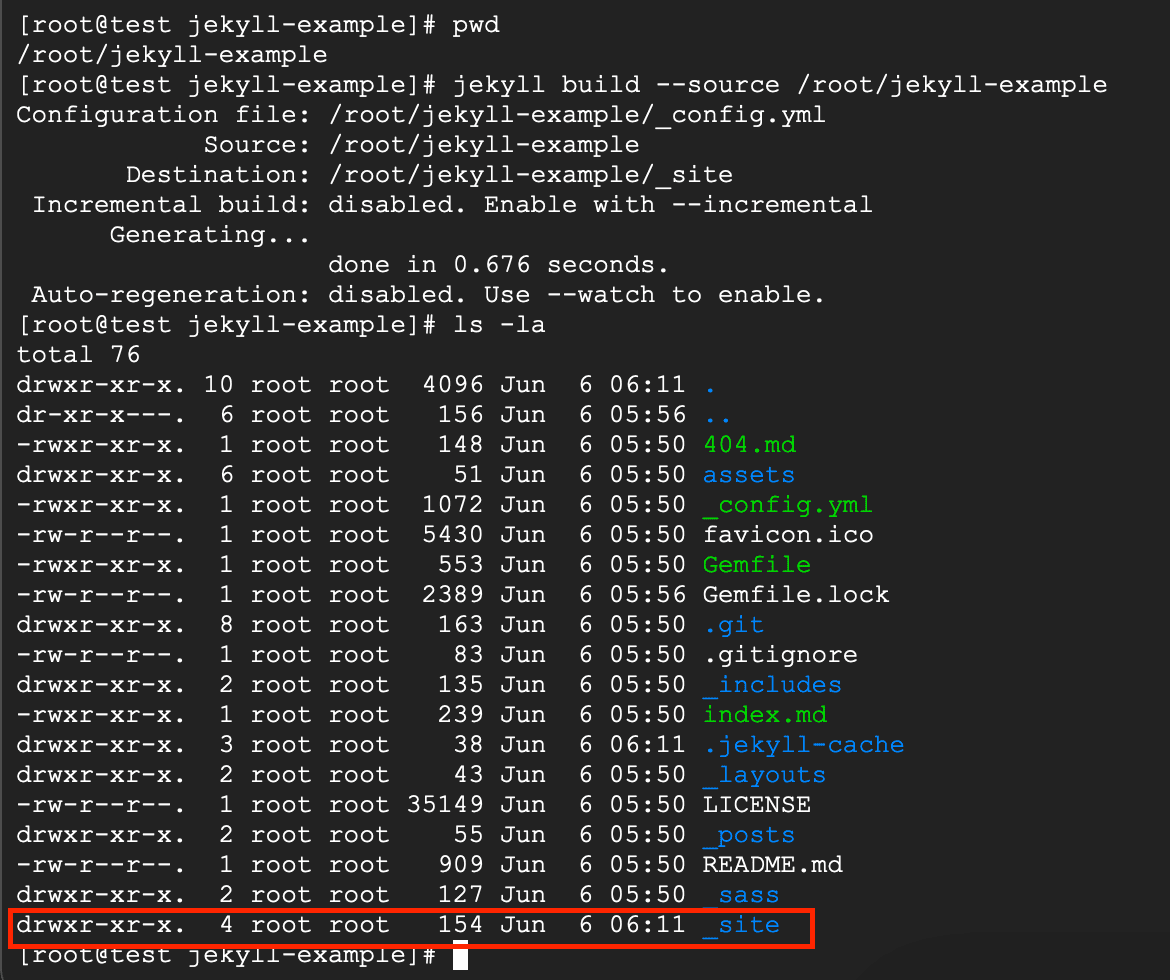
The site has been built successfully, we need to install Nginx to present this _site.
Choose a default version of the Nginx:
# sudo yum install nginx
After installing the nginx and keep going to execute these commands:
-
--- enable nginx ---
# sudo systemctl enable nginx
  --- give the traffic permission for http and https ---
  # sudo firewall-cmd --permanent --add-service=http
  # sudo firewall-cmd --permanent --add-service=https
# sudo firewall-cmd --reload-
--- start nginx ---
# sudo systemctl start nginx

--- restart nginx, optional command ---
# sudo nginx -s reload
All the preparation has been done, we need to move the _site to Nginx site directory.
Keep the current path in /root/jekyll-example, but this is only for example,
you can custom your path, such as “username/home/your-blog”
The default path of Nginx site on CentOS in /usr/share/nginx/html/, execute these commands:
--- delete nginx html contents before move ---
# rm -rf /usr/share/nginx/html/*

--- move site that we've built to nginx site ---
# mv _site/* /usr/share/nginx/html/
Sometimes we need to execute extra commands to unlock restricting,
depending on what is the operating system you are a current use.
If you’ve done above, still cannot successfully visit your site,
such as 403 Forbidden, you can skip it if one of them can work:
-
Give the access permission to the site directory:
# chcon -Rt httpd_sys_content_t /usr/share/nginx/html/ --- Then restart to refresh the settings: --- # sudo nginx -s reload -
Change the
SELinux=enforcingto disabled, if on CentOS 7/8:# vim /etc/selinux/config SELINUX=disabled --- after doing this, have to reboot the system ---
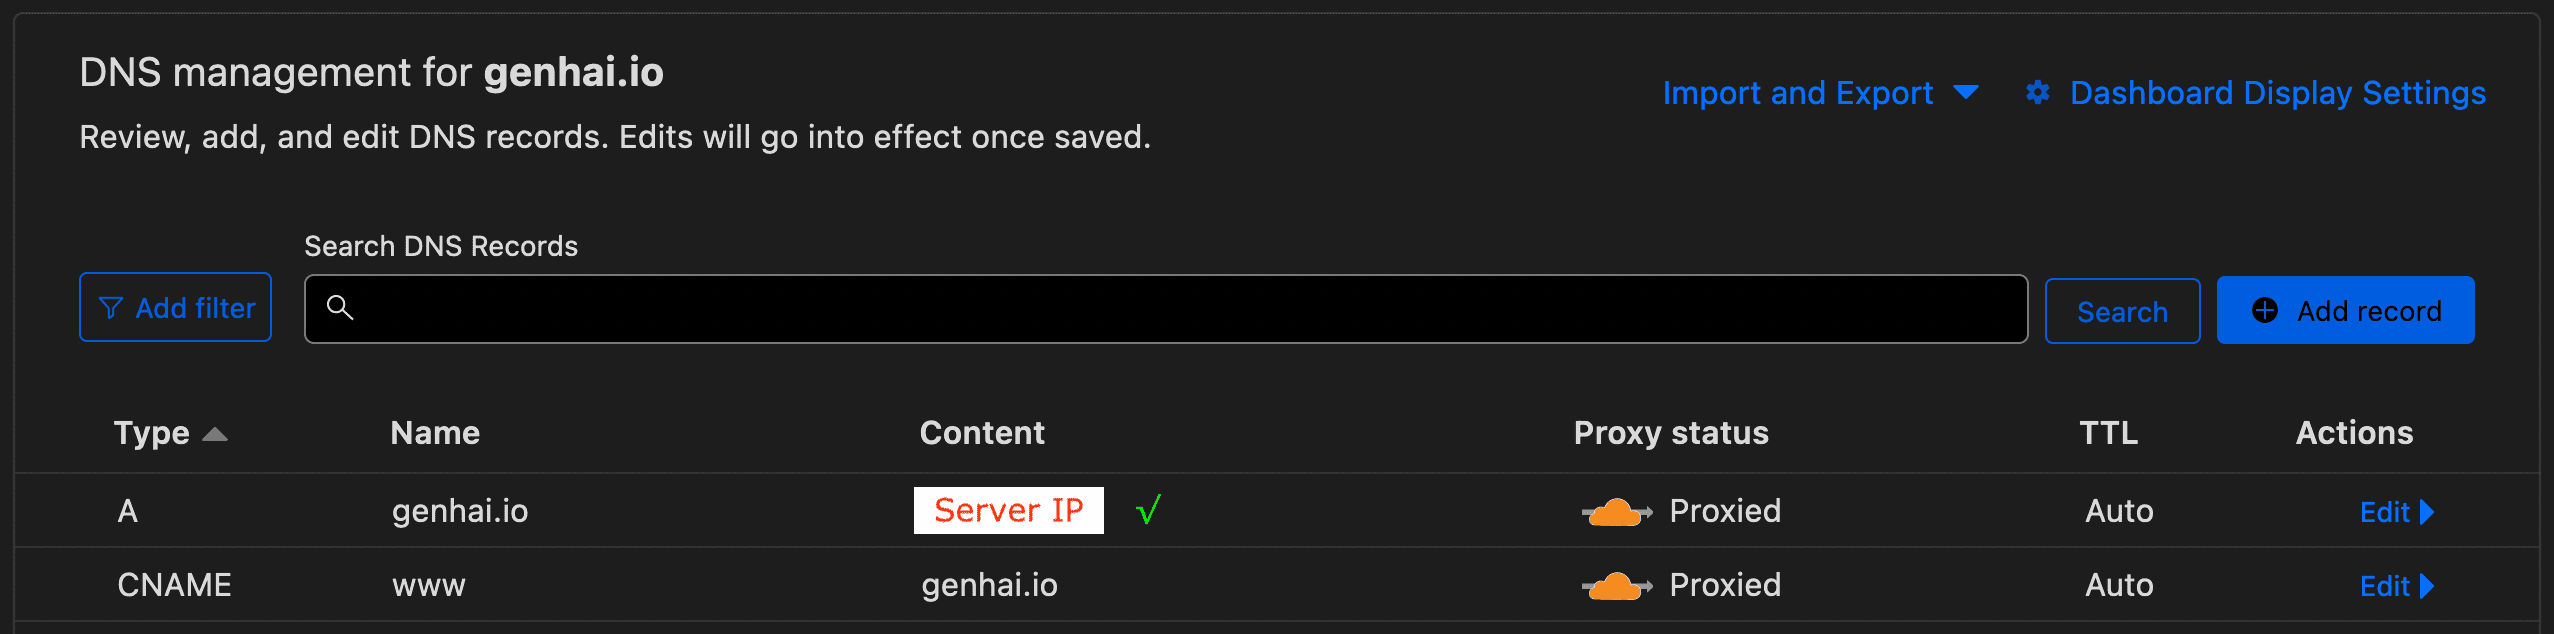
It’s a good idea to choose a free CDN which can deliver the contents to worldwide for individuals, also can keep your standalone real IP behind the proxy.
Set up the Cloudflare for proxying your site is complicated.
This is a front-end proxy for a standalone server in Cloudflare DNS settings,
substitute the Server IP and Domain to your own information.
The jekyll-blog-routine-deploy-script is an automation script that automatically initial or routine update Jekyll.